一、Spring Boot与缓存
JSR107中JCache简介
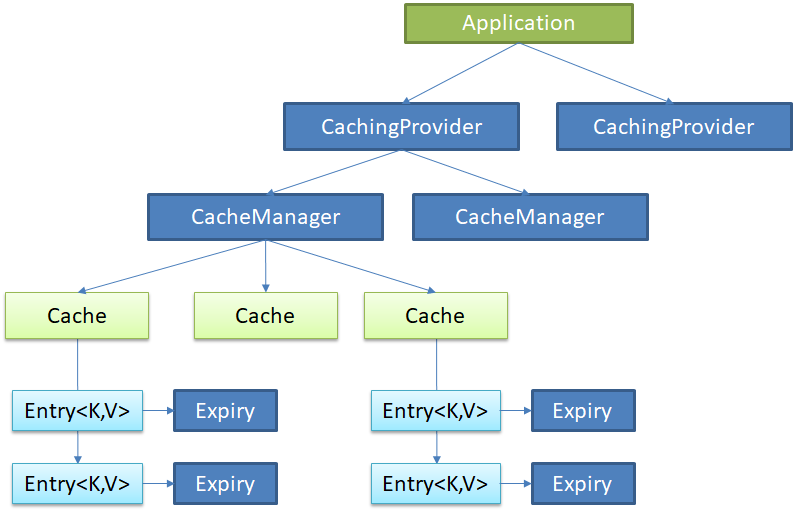
JCache定义了5个核心接口,分别是CachingProvider, CacheManager, Cache, Entry 和 Expiry
CachingProvider定义了创建、配置、获取、管理和控制多个CacheManager。一个应用可以在运行期访问多个CachingProvider
CacheManager定义了创建、配置、获取、管理和控制多个唯一命名的Cache,这些Cache存在于CacheManager的上下文中。一个CacheManager仅被一个CachingProvider所拥有
Cache是一个类似Map的数据结构并临时存储以Key为索引的值。一个Cache仅被一个CacheManager所拥有
Entry是一个存储在Cache中的key-value对
Expiry 每一个存储在Cache中的条目有一个定义的有效期。一旦超过这个时间,条目为过期的状态。一旦过期,条目将不可访问、更新和删除。缓存有效期可以通过ExpiryPolicy设置
Spring缓存抽象
Spring定义了org.springframework.cache.Cache和org.springframework.cache.CacheManager接口来统一不同的缓存技术,并支持使用JCache(JSR-107)注解简化我们开发,但并没有按照JCache实现缓存管理
- Cache接口为缓存的组件规范定义,包含缓存的各种操作集合
- CacheManager接口实现类用于管理各种Cache
Spring缓存类及注解说明
| 类&注解 | 说明 |
|---|
| Cache | 缓存接口,定义缓存操作 |
| CacheManager | 缓存管理器,管理各种缓存(Cache)组件 |
| @Cacheable | 主要针对方法配置,能够根据方法的请求参数对其结果进行缓存 |
| @CacheEvict | 清空缓存 |
| @CachePut | 调用方法并更新缓存 |
| @EnableCaching | 开启基于注解的缓存 |
| keyGenerator | 缓存数据时key生成策略 |
| serialize | 缓存数据时value序列化策略 |
Cache实现有:RedisCache、EhCacheCache、ConcurrentMapCache等
Spring Boot缓存使用
前置条件:引入spring-boot-starter-cache并在配置类上加入@EnableCaching
- @Cacheable的使用【结果存入缓存,下次现在缓存中查找】
 1
 2
 3
 4
 5
 6
 7
 8
 9
10
11
12
13
14
15
16
17
18
19
20
21
22
| /**
* @Cacheable属性介绍
*
* cacheNames/value 指定Cache的名称,CacheManager根据此名称查找对应的Cache
*
* key 如何生成缓存数据的key,可使用SPEL表达式指定,默认使用方法参数的值作为key
* 例如:#id、#a0、#p0、#root.args[0]【均是使用参数id作为key】
*
* keyGenerator key的生成器,可以自己指定规则生成id。key/keyGenerator二选一
*
* condition 指定条件的情况下才缓存
*
* unless 否定缓存;当unless指定的条件为true,方法的返回值就不会被缓存
*
* sync 是否使用异步模式,默认否
*
* cacheManager/cacheResolver 指定缓存管理器
*/
@Cacheable(cacheNames="employee")
public Employee getEmp(Integer id) {
return employeeMapper.getEmpById(id);
}
|
1
2
3
4
5
6
7
8
| /**
* beforeInvocation 是否在调用方法之前情况,默认false【如果方法执行出现异常不会删除缓存信息】
* allEntries 是否删除cacheNames域下的所有缓存信息,默认false
*/
@CacheEvict(cacheNames="employee", key="#id")
public void deleteEmp(Integer id) {
employeeMapper.deleteEmpById(id);
}
|
- @CachePut的使用【更新缓存,存入缓存的是其返回值】
1
2
3
4
5
6
7
8
| /**
* 返回值必须是要存入缓存的对象,不可返回void
*/
@CachePut(cacheNames="employee", key="#employee.id")
public Employee updateEmp(Employee employee) {
employeeMapper.updateEmp(employee);
return employee;
}
|
- @Caching的使用【Caching是Cacheable、CachePut和CacheEvict的组合用于应对复杂情况】
1
2
3
4
5
| public @interface Caching {
Cacheable[] cacheable() default {};
CachePut[] put() default {};
CacheEvict[] evict() default {};
}
|
- @CacheConfig的使用【用于抽取公共配置,简化方法上的注解】
1
2
3
4
| @CacheConfig(cacheNames="employee")
public class EmployeeService {
//......
}
|
附:Cache SpEL
| 名字 | 描述 | 示例 |
|---|
| methodName | 当前被调用的方法名 | #root.methodName |
| method | 当前被调用的方法 | #root.method.name |
| target | 当前被调用的目标对象 | #root.target |
| targetClass | 当前被调用的目标对象类 | #root.targetClass |
| args | 当前被调用的方法的参数列表 | #root.args[0] |
| caches | 当前方法调用使用的缓存列表(如@Cacheable(value={“cache1”, “cache2”})),则有两个cache | #root.caches[0].name |
| argument name | 方法参数的名字. 可以直接 #参数名 ,也可以使用#p0或#a0 的形式,0代表参数的索引 | #参数名 、 #a0 、 #p0 |
| result | 方法执行后的返回值(仅当方法执行之后的判断有效,如‘unless’,’cache put’的表达式 ’cache evict’的表达式beforeInvocation=false) | #result |
Spring Boot缓存整合原理
Spring Boot初始化时会通过spring-boot-autoconfigure.jar的META-INF下的spring.factories导入CacheAutoConfiguration
CacheAutoConfiguration通过内部内CacheConfigurationImportSelector注册了如下类信息
 1
 2
 3
 4
 5
 6
 7
 8
 9
10
| org.springframework.boot.autoconfigure.cache.GenericCacheConfiguration
org.springframework.boot.autoconfigure.cache.JCacheCacheConfiguration
org.springframework.boot.autoconfigure.cache.EhCacheCacheConfiguration
org.springframework.boot.autoconfigure.cache.HazelcastCacheConfiguration
org.springframework.boot.autoconfigure.cache.InfinispanCacheConfiguration
org.springframework.boot.autoconfigure.cache.CouchbaseCacheConfiguration
org.springframework.boot.autoconfigure.cache.RedisCacheConfiguration
org.springframework.boot.autoconfigure.cache.CaffeineCacheConfiguration
org.springframework.boot.autoconfigure.cache.SimpleCacheConfiguration
org.springframework.boot.autoconfigure.cache.NoOpCacheConfiguratio
|
Spring Boot会根据当前环境上下文使用对应的CacheConfiguration默认使用SimpleCacheConfiguration
SimpleCacheConfiguration导入了ConcurrentMapCacheManager作为CacheManager的实现
 1
 2
 3
 4
 5
 6
 7
 8
 9
10
11
12
13
14
15
16
| @Configuration
@ConditionalOnMissingBean(CacheManager.class)
@Conditional(CacheCondition.class)
class SimpleCacheConfiguration {
//提供了CacheManager
@Bean
public ConcurrentMapCacheManager cacheManager() {
ConcurrentMapCacheManager cacheManager = new ConcurrentMapCacheManager();
List<String> cacheNames = this.cacheProperties.getCacheNames();
if (!cacheNames.isEmpty()) {
cacheManager.setCacheNames(cacheNames);
}
return this.customizerInvoker.customize(cacheManager);
}
}
|
ConcurrentMapCacheManager使用ConcurrentMapCache作为Cache的实现
 1
 2
 3
 4
 5
 6
 7
 8
 9
10
11
12
13
14
15
16
17
18
19
20
21
22
23
24
25
| public class ConcurrentMapCacheManager implements CacheManager, BeanClassLoaderAware {
//根据key获得Cache的方法
public Cache getCache(String name) {
Cache cache = this.cacheMap.get(name);
if (cache == null && this.dynamic) {
synchronized (this.cacheMap) {
cache = this.cacheMap.get(name);
if (cache == null) {
cache = createConcurrentMapCache(name);
this.cacheMap.put(name, cache);
}
}
}
return cache;
}
//创建Cache
protected Cache createConcurrentMapCache(String name) {
SerializationDelegate actualSerialization = (isStoreByValue() ? this.serialization : null);
return new ConcurrentMapCache(name,
new ConcurrentHashMap<>(256),
isAllowNullValues(),
actualSerialization);
}
}
|
@EnableCaching导入了CachingConfigurationSelector,CachingConfigurationSelector使用动态代理切入使用Cache相关注解的方法
Spring Boot与Redis整合
前置条件:引入spring-boot-starter-data-redis
 1
 2
 3
 4
 5
 6
 7
 8
 9
10
11
| spring:
redis:
cluster:
max-redirects: 5
nodes:
- 192.168.1.158:7000
- 192.168.1.158:7001
- 192.168.1.158:7002
- 192.168.1.158:7003
- 192.168.1.158:7004
- 192.168.1.158:7005
|
Spring boot 1.x版本
配置RedisTemplate<Object, Object>用于存储value转换位json的数据【默认使用JDK序列化机制】
RedisTemplate<Object, Object>替换了全局RedisAutoConfiguration注入的转化
 1
 2
 3
 4
 5
 6
 7
 8
 9
10
11
| @Bean
public RedisTemplate<Object, Object> redisTemplate(RedisConnectionFactory redisConnectionFactory) {
Jackson2JsonRedisSerializer<Object> jackson2JsonRedisSerializer = new Jackson2JsonRedisSerializer<Object>(Object.class);
RedisTemplate<Object, Object> template = new RedisTemplate<Object, Object>();
template.setConnectionFactory(redisConnectionFactory);
template.setKeySerializer(jackson2JsonRedisSerializer);
template.setValueSerializer(jackson2JsonRedisSerializer);
template.setHashKeySerializer(jackson2JsonRedisSerializer);
template.setHashValueSerializer(jackson2JsonRedisSerializer);
return template;
}
|
 1
 2
 3
 4
 5
 6
 7
 8
 9
10
11
12
13
14
15
16
17
18
19
20
21
22
23
24
| @Bean
public RedisCacheManager cacheManager(RedisConnectionFactory connectionFactory) {
RedisCacheConfiguration config = RedisCacheConfiguration.defaultCacheConfig()
.entryTtl(Duration.ZERO) //设置缓存过期时间
.serializeKeysWith(RedisSerializationContext.SerializationPair.fromSerializer(keySerializer()))
.serializeValuesWith(RedisSerializationContext.SerializationPair.fromSerializer(valueSerializer()))
.disableCachingNullValues();
RedisCacheManager redisCacheManager = RedisCacheManager.builder(connectionFactory)
.cacheDefaults(config)
.transactionAware()
.build();
return redisCacheManager;
}
private RedisSerializer<String> keySerializer() {
return new StringRedisSerializer();
}
private RedisSerializer<Object> valueSerializer() {
return new GenericJackson2JsonRedisSerializer();
}
|
取出CacheManager对象
cacheManager.getCacheNames()只能拿到曾经访问过的CacheName,没访问过的无法得到
1
2
3
4
5
6
| public class EmployeeService {
public void printCache(){
Collection<String> cacheNames = cacheManager.getCacheNames();
System.out.println(cacheNames);
}
}
|
二、Spring Boot与消息
引入消息中间件解决:模块耦合、异步问题、流量削峰。
参见Spring Boot整合
三、Spring Boot与检索
导入依赖
 1
 2
 3
 4
 5
 6
 7
 8
 9
10
| <dependency>
<groupId>org.springframework.boot</groupId>
<artifactId>spring-boot-starter-data-elasticsearch</artifactId>
</dependency>
<!-- 使用jest时导入 -->
<dependency>
<groupId>io.searchbox</groupId>
<artifactId>jest</artifactId>
</dependency>
|
使用Jest整合ElasticSearch
配置链接
1
2
3
4
5
| spring:
elasticsearch:
jest:
uris:
- "http://192.168.1.155:9300"
|
使用示例
 1
 2
 3
 4
 5
 6
 7
 8
 9
10
11
12
13
14
15
16
17
18
19
20
21
22
23
24
25
26
27
28
29
30
31
32
33
34
35
36
37
38
39
40
41
42
| //实体类
public class Book {
@JestId
private String id;
private Date postDate;
private String title;
private String content;
private Long authorId;
//==============Getter/Setter==============
}
//创建数据
@Test
public void testCreate() throws IOException {
Book book = new Book();
book.setId("100");
book.setAuthorId(1001L);
book.setContent("好看的书");
book.setPostDate(new Date());
book.setTitle("jest系列");
Index.Builder builder = new Index.Builder(book);
Index index = builder.index("book").type("book_type").build();
DocumentResult documentResult = jestClient.execute(index);
System.out.println(documentResult.getJsonString());
}
//查询数据
@Test
public void testQuery() throws IOException {
XContentBuilder queryBuilder = XContentFactory.jsonBuilder()
.startObject()
.startObject("query")
.startObject("match_all")
.endObject()
.endObject()
.endObject();
Search search= new Search.Builder( Strings.toString(queryBuilder))
.addIndex("book").addType("book_type").build();
SearchResult documentResult = jestClient.execute(search);
System.out.println(documentResult.getSourceAsString());
}
|
使用Spring Data整合ElasticSearch
注意
Spring Data与ElasticSearch版本对应有限制,先查看spring-boot-starter-data-elasticsearch引用的Spring Data ElasticSearch版本,如果冲突使用对应版本的ElasticSearch或者使用对应的Spring Data ElasticSearch版本【记得剔除spring-boot-starter-data-elasticsearch中的引用】
| spring data elasticsearch | elasticsearch |
|---|
| 3.2.x | 6.5.0 |
| 3.1.x | 6.2.2 |
| 3.0.x | 5.5.0 |
| 2.1.x | 2.4.0 |
| 2.0.x | 2.2.0 |
| 1.3.x | 1.5.2 |
配置信息
1
2
3
4
5
6
| spring:
data:
elasticsearch:
cluster-name: docker-cluster
#注意端口默认位9300并非http通讯端口
clusterNodes: 192.168.1.155:9300
|
使用示例
 1
 2
 3
 4
 5
 6
 7
 8
 9
10
11
12
13
14
15
16
17
18
19
20
21
22
23
24
| //创建数据
@Test
public void testCreate() throws IOException {
Book book = new Book();
book.setId("100");
book.setAuthorId(1001L);
book.setContent("好看的书");
book.setPostDate(new Date());
book.setTitle("jest系列");
IndexQuery indexQuery = new IndexQuery();
indexQuery.setObject(book);
indexQuery.setIndexName("book");
indexQuery.setType("book_type");
template.index(indexQuery);
}
//查询数据
@Test
public void testQuery() throws IOException {
NativeSearchQueryBuilder nativeSearchQuery = new NativeSearchQueryBuilder().withQuery(new MatchAllQueryBuilder());
List<Book> books = template.queryForList(nativeSearchQuery.build(), Book.class);
System.out.println(books);
}
|
四、Spring Boot与任务
异步任务
- 在主配置类上使用
@EnableAsync开启异步注解功能 - 在需要异步支持的方法上标注
@Async
1
2
3
4
| @Async
public void asyncMethod() throws InterruptedException{
//do something....
}
|
定时任务
Spring提供了异步执行任务调度的方式,提供TaskExecutor 、TaskScheduler用户可自扩展
 1
 2
 3
 4
 5
 6
 7
 8
 9
10
11
12
13
14
| /**
* fixedDelay 一次执行完毕时间点之后多长时间再执行
* fixedDelayString 与fixedDelay意思相同,只是使用字符串的形式。唯一不同的是支持占位符
* fixedRate 上一次开始执行时间点之后多长时间再执行
* fixedRateString 与fixedRate意思相同,只是使用字符串的形式。唯一不同的是支持占位符
* initialDelay 第一次延迟多长时间后再执行
* initialDelayString 与initialDelay意思相同,只是使用字符串的形式。唯一不同的是支持占位符
* zone 时区,默认取当前计算器时区
* cron 使用cron表达式进行设置
*/
@Scheduled(cron="0 */1 * * * ?")
public void scheduled() {
System.out.println("---------------------------");
}
|
附cron表达式
| 字段 | 允许值 | 允许的特殊字符 |
|---|
| 秒 | 0-59 | , - * / |
| 分 | 0-59 | , - * / |
| 小时 | 0-23 | , - * / |
| 日期 | 1-31 | , - * ? / L W C |
| 月份 | 1-12 | , - * / |
| 星期 | 0-7或SUN-SAT 0,7是SUN | , - * ? / L C # |
| 特殊字符 | 代表含义 |
|---|
| , | 枚举 |
| - | 区间 |
| * | 任意 |
| / | 步长 |
| ? | 日/星期冲突匹配 |
| L | 最后 |
| W | 工作日 |
| C | 和calendar联系后计算过的值 |
| # | 星期,4#2,第2个星期四 |
邮件任务
1
2
3
4
| <dependency>
<groupId>org.springframework.boot</groupId>
<artifactId>spring-boot-starter-mail</artifactId>
</dependency>
|
1
2
3
4
5
| spring:
mail:
host: smtp.qq.com
username: source@qq.com
password: lvhotbvqbezejfbb #授权码是独立的需要去生成
|
发送邮件
1
2
3
4
5
6
7
8
| public void sendSimpleEmail() {
SimpleMailMessage simpleMessage = new SimpleMailMessage();
simpleMessage.setFrom("source@qq.com");
simpleMessage.setTo("target@qq.com");
simpleMessage.setSubject("测试邮件");
simpleMessage.setText("测试邮件内容");
mailSender.send(simpleMessage);
}
|
 1
 2
 3
 4
 5
 6
 7
 8
 9
10
11
12
13
14
| public void sendMimeEmail() throws MessagingException {
MimeMessage mimeMessage = mailSender.createMimeMessage();
/**
* MimeMessageHelper(MimeMessage mimeMessage, boolean multipart)
* 发生附件邮件是multipart要设置为true
*/
MimeMessageHelper helper = new MimeMessageHelper(mimeMessage,true);
helper.setFrom("source@qq.com");
helper.setTo("target@qq.com");
helper.setSubject("测试邮件");
helper.setText("<html><body><div style='color:red'>测试内容</div></body></html>",true);
helper.addAttachment("attach.png", new ClassPathResource("attach.png"));
mailSender.send(helper.getMimeMessage());
}
|
五、Spring Boot与安全
参见Spring Security使用指南
六、Spring Boot与热部署
引入Spring Boot官方提供的热部署工具即可拥有热部署能力
1
2
3
4
5
| <dependency>
<groupId>org.springframework.boot</groupId>
<artifactId>spring-boot-devtools</artifactId>
<optional>true</optional>
</dependency>
|
七、Spring Boot与监管
Spring Boot提供了将应用程序推送到生产环境时监视和管理应用功能,可以使用HTTP端点或JMX来管理和监视应用程序
第一步:引入spring-boot-actuator模块
1
2
3
4
5
| <dependency>
<groupId>org.springframework.boot</groupId>
<artifactId>spring-boot-starter-actuator</artifactId>
<optional>true</optional>
</dependency>
|
第二步:yml中调整启用的监控模块
1
2
3
4
5
6
| # 启用某个模块,替换模块名shutdown即可
management.endpoint.shutdown.enabled=true
# 将所有模块的默认开启全部置为false,并单独开启某个模块
management.endpoints.enabled-by-default=false
management.endpoint.info.enabled=true
|
附:端点的默认启用情况
| ID | 描述 | 默认情况下启用 |
|---|
auditevents | 公开当前应用程序的审核事件信息。 | 是 |
beans | 显示应用程序中所有Spring bean的完整列表。 | 是 |
caches | 暴露可用的缓存。 | 是 |
conditions | 显示在配置和自动配置类上评估的条件以及它们匹配或不匹配的原因。 | 是 |
configprops | 显示所有的整理列表@ConfigurationProperties。 | 是 |
env | 露出Spring的属性ConfigurableEnvironment。 | 是 |
health | 显示应用健康信息。 | 是 |
httptrace | 显示HTTP跟踪信息(默认情况下,最后100个HTTP请求 - 响应交换)。 | 是 |
info | 显示任意应用信息。 | 是 |
integrationgraph | 显示Spring Integration图。 | 是 |
loggers | 显示和修改应用程序中记录器的配置。 | 是 |
metrics | 显示当前应用程序的“指标”信息。 | 是 |
mappings | 显示所有@RequestMapping路径的整理列表。 | 是 |
scheduledtasks | 显示应用程序中的计划任务。 | 是 |
sessions | 允许从Spring Session支持的会话存储中检索和删除用户会话。使用Spring Session对响应式Web应用程序的支持时不可用。 | 是 |
shutdown | 允许应用程序正常关闭。 | 没有 |
threaddump | 执行线程转储。 | 是 |
第三步:暴露端点
 1
 2
 3
 4
 5
 6
 7
 8
 9
10
11
| management:
endpoints:
jmx:
exposure:
include:
health,info
web:
exposure:
include: "*"
exposure:
exclude: env,beans
|
附录:默认端点的暴露情况
| 属性 | 默认 |
|---|
management.endpoints.jmx.exposure.exclude | |
management.endpoints.jmx.exposure.include | *【代表全部暴露】 |
management.endpoints.web.exposure.exclude | |
management.endpoints.web.exposure.include | info, health |
注:访问路径默认以/actuator开头